OAKLAND WOLVERINE

MODEL BOAT CLUB
|
OAKLAND WOLVERINE
MODEL BOAT CLUB |
|
Building Tips feature ( SCALE GUYS ~ SEE PICTURE BELOW )
Being that we are in the building season, I thought addressing the subject of gluing and sealing would be helpful. This may seem elementary, but I can guarantee you, failed glue joints will ruin your day at the pond
Safety: *Ventilate!!!!! Fumes and vapors given off by epoxy, polyester or CA can be very harmful. If you are working in an enclosed un-vented area (Basement/garage), it is important that you setup a fan and open a window to expel the vapors. Epoxy vapors come during the curing process and have minimum to no odor. CA is really bad stuff! *Wear disposable latex gloves. If you cannot wear latex, uncured epoxy can be removed from your had with Fast Orange hand soap. *Wear a quality dust mask when sanding. Almost everything that we sand on our boats is harmful when breathed into your lungs. When sanding off old paint, always wear a respirator mask. Paint dust is as toxic as airborne uncured paint. Surface Preparation ( The most important part of the process): *Before repairing or gluing items to fiberglass (epoxy or polyester) it is mandatory to remove the glossy finish that occurs in the curing process. Scuffing the surface with a wetted Scotch Bright Pad prior to sanding will help to keep the sand paper from clogging up. *Before gluing plywood it is also mandatory to remove the oily finish that is present on the outer surfaces. This can be done by sanding with a fine to medium grit paper. *Surface preparation for other types of wood should be the same as plywood. *Before gluing Styrofoam ( use only high density ) it also has a coating on the outer surfaces that needs to be removed. This can be done by sanding with a fine to medium grit paper. I would strongly recommend cutting it away. *After sanding, remove all dust. clean fiberglass and wood surfaces with lacquer thinner. This will assure a good bonding surface, free of oil and other contaminates. do not use lacquer thinner on Styrofoam unless you want a melted mess.
Gluing: *Although many boaters use it, I personally do not recommend using CA for bonding any joints needing structural integrity. Unfortunately, I have experienced too many failures in using it for applications other than tacking or non-structural applications. *Slow drying epoxies are widely recommended for fiberglass or wood applications. They work extremely well on wood hull structural joints and for sheeting hull decks and bottoms. Clamps, pins or weights will be necessary to hold things in place while the glue cures. When gluing with epoxy, more does not mean better. After attaching parts together wipe off the excess. Big globs of glue not only look bad, they add weight and give no added strength. *Most of the fast drying ( 5-10 Minute ) epoxies, I have used recently performed well in structural joint applications. I find that it sets up to fast for large gluing areas like decks. Unless you want to hold things together, clamps, pins or weights will be necessary to hold thins in place while the glue cures. The big advantage, they expedite the building time. *Soft woods, especially the open ends of cedar and lite ply will wick glue into them and leave what is called a dry joint. These joints are highly susceptible to failure. Most epoxy manufacturers suggest that you coat these woods with a light first coat of epoxy that is wicked into the wood. Once dry, the sealed surfaces are lightly sanded and then glue as normal. *I have experienced no failures in bonding to either balsa or Styrofoam with both types of epoxy if the surfaces are properly cleaned and prepped. *Sandbags make ideal weights, especially in contoured areas. Make up multiple sizes to fit your applications. Cloth bags seem to work better than zip lock bags. Use wax paper between bag and surface to avoid accidental bonding.
Fillets/Sealing: *Fillets can add a lot to the appearance of you hull. I find an easy way to do them is to mix west system 407 Low - Density filler with any type (slow/fast) of epoxy to a thick paste consistency. i run masking tape the width of the fillet on each surface that the fillet is against. This creates a nice visual line on each surface and keeps any excess mixture from adhering to the surfaces. After applying the filler mixture I use a piece of wood with the desired radius on it as a scraper to remove the excess. If you use long setting epoxy in the mix, you may need to use the scraper multiple times to keep the fillet shape. let all epoxies harden for at least 24 hours before sanding. Once the fillet is hardened, remove the tape and using sandpaper and a dowel rod, sand fillet to a final shape. *The 407 filler changes the properties of the epoxy and makes it real easy to sand. Most fillers or thickeners when added to epoxy will revise the laminating and bonding properties of the epoxy. Refer to West Systems technical publications for more info on additives. *Sealing a wood hull is mandatory. A simple accepted method is to paint the hull with slow dry epoxy and then scrape it with a playing card to remove the excess. I prefer to use a lint free rag and rub the epoxy in to the hull. This minimizes the amount of epoxy used and reduces the final sanding effort. Either method works.
Sanding: * When sanding on epoxy, it is not recommended to sand too long or vigorously in the same spot. Like paint, friction will soften the epoxy and it will begin to clog the sandpaper. *To get a nice flat finish when sanding, you need a nice flat sanding block. An ideal sanding block can be made from a piece of hardwood or birch plywood. The surface to which the sandpaper will be mounted needs to be flat and free of imperfections. Attach the sandpaper to the block using two way carpet tape. Wrapping the sandpaper loosely around the block will not give you the same results. It is a little more work, but the results are much better. Make up multiple blocks with different sandpaper grits. *3M has come out with sandpaper called "Sandblaster". It comes in colors (yellow, purple and green) depending on the grit. It does not load up like regular sandpaper and lasts longer. It is a little more expensive but well worth the money. It is available at most hardware centers. Amen
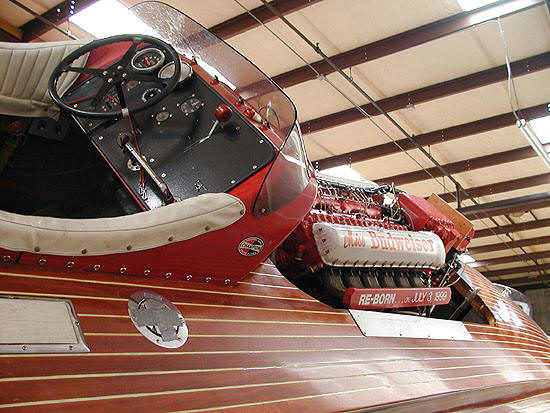
TIPS FOR SCALE GUYS SCALE GUYS. HERE IS A GREAT SHOT OF THE DASHBOARD AND WINDSHIELD DETAIL FOR OPEN COCKPIT HYDROS. THIS BUDWEISER COCKPIT COULD ACCOMMODATE TWO PEOPLE, THAT IS PROBABLY WHY THERE IS A SISSY BAR.
·
|
|
Oakland Wolverine Model Boat Club |